##### INDEX
- Introduction
- LEDE on the AR150Overview of AR150 configurationInstall lede to the gl-inet AR150Install required packages/etc/config/network/etc/config/wireless/etc/config/dhcp/etc/config/firewall/etc/firewall.user/etc/tor/torrc/etc/resolv.conf.backup/etc/init.d/tor/etc/rc.localConsiderations about using a device different then the AR150Considerations about adding a third VPN network
- LEDE on the WDR841NOverview of WDR841N configurationInstall lede to the tp-link WDR841N/etc/config/network/etc/config/wireless/etc/config/dhcp/etc/config/firewallConsiderations about portsConsiderations about using a different device then the WDR841N
### Introduction
Connections to your ISP are most usually non-encrypted by default, meaning that it is a good idea to take some countermeasures, and ISP provided home routers should never be trusted because of different reasons, like crappy firmwares / backdoors / poor passwords.
With this setup we can:
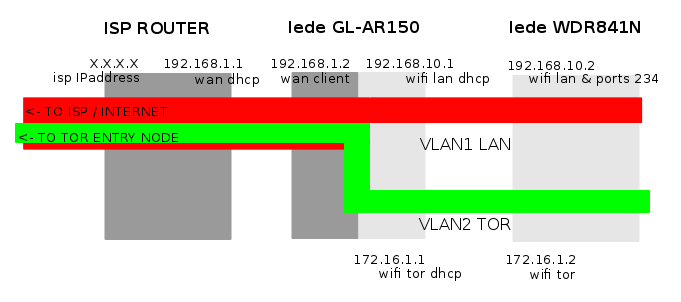
– treat the ISP router as a stranger: WAN.
– add a second, parallel, “LAN” to our home, routing ONLY to the tor network.
It is reproducible with all sort of lede-supported devices but the first one should have at least 64MB RAM and 16MB Flash storage, and the devices should be capable of emitting multiple WLANs (I only tested ar71xx devices).
In my case, the gl-inet ar150 acts as a firewall between 3 networks:
– WAN: the ISP router network connecting to the internet
– LAN: a normal LAN with no special feature
– TOR: lede initiates a connection to the tor network, and all the traffic allowed to pass through the firewall is tunneled through this connection.
Encapsulating the LAN and TOR networks in vlans, we are able to reproduce those networks on successive routers maintaining the two networks separate, each one of them serving a wifi connection (in roaming on different channels) and ethernet ports.
### LEDE on AR150 configuration
## Overview of the final configuration
WAN port = WAN
LAN port = tagged VLAN 1 (LAN), tagged VLAN 2 (TOR)
wlan0 wifi = LAN
wlan0.1 wifi = TOR
Relevant files are:
– /etc/config/network
– /etc/config/wireless
– /etc/config/dhcp
– /etc/config/firewall
– /etc/firewall.user
– /etc/tor/torrc
– /etc/resolv.conf.backup
– /etc/init.d/tor
– /etc/rc.local
### Install lede to the gl-inet AR150
Download the latest lede release (as of march 2017) https://downloads.lede-project.org/releases/17.01.0/targets/ar71xx/generic/lede-17.01.0-r3205-59508e3-ar71xx-generic-gl-ar150-squashfs-sysupgrade.bin.
My recommended method is to perform a sysupgrade deleting all previous configuration, for security and hygiene. The “- i” option for sysupgrade matters, press “N” when asked to “keep config files”!
You can simply copy the downloaded image to the AR150 and flash it form there:
# scp lede-17.01.0-r3205-59508e3-ar71xx-generic-gl-ar150-squashfs-sysupgrade.bin root@192.168.8.1:/tmp/
# sysupgrade -i -v /tmp/lede-17.01.0-r3205-59508e3-ar71xx-generic-gl-ar150-squashfs-sysupgrade.bin
## Install required packages
Connect the AR150 to the internet (WAN port) and install tor, tor-geoip and macchanger:
# opkg update

# opkg install tor tor-geoip macchanger
## /etc/config/network on the AR150
Here we create a new network (TOR), setup two vlans, and assign the correct interfaces to every network.
Also, I disable ipv6, for a personal lack of knowledge (sigh!)…
config interface 'loopback'

option ifname 'lo'

option proto 'static'

option ipaddr '127.0.0.1'

option netmask '255.0.0.0'
config interface ‘lan’
option type ‘bridge’
option ifname ‘eth1.1’
option proto ‘static’
option ipaddr ‘192.168.10.1’
option netmask ‘255.255.255.0’
# option ip6assign ’60’
option _orig_ifname ‘eth1.1 wlan0’
option _orig_bridge ‘true’
config interface ‘tor’
option type ‘bridge’
option ifname ‘eth1.2’
option proto ‘static’
option ipaddr ‘172.16.1.1’
option netmask ‘255.255.255.0’
option _orig_ifname ‘eth1.2 wlan0-1’
option _orig_bridge ‘true’
config interface ‘wan’
option ifname ‘eth0’
option proto ‘dhcp’
config switch
option name ‘switch0’
option reset ‘1’
option enable_vlan ‘1’
config switch_vlan
option device ‘switch0’
option vlan ‘1’
option ports ‘0t 1t’
config switch_vlan

option device 'switch0'

option vlan '2'

option ports '0t 1t'
## /etc/config/wireless on the AR150
We create here 2 different wifi networks in AP mode. Remember that the network interfaces name (as used in /etc/config/network) are relative to their position in this file, so the first “radio0” device will be wlan0, the second “radio0” will be wlan0.1 and successive will be wlan0.2, wlan0.3 and so on!
For privacy reasons, we give to the wifi networks a MAC-address of our choice.
For further knowledge about the options in the first block, please refer to the lede/openwrt documentation
config wifi-device 'radio0'

option type 'mac80211'

option channel '11'

option hwmode '11g'

option path 'platform/ar933x_wmac'

option htmode 'HT20'

option txpower '18'

option country 'US'

option distance '50'
config wifi-iface ‘default_radio0’
option device ‘radio0’
option network ‘lan’
option mode ‘ap’
option ssid ‘LAN-wifi’
option encryption ‘psk2+aes’
option key ‘Your_supersecret_password_for_LAN’
option macaddr ’84:df:69:a2:77:aa’
config wifi-iface 'tor_radio0'

option device 'radio0'

option network 'tor'

option mode 'ap'

option ssid 'TOR-wifi'

option encryption 'psk2+aes'

option key 'Your-supersecret-password-for-TOR'

option macaddr 'ab:e7:77:a5:a5:cf'
## /etc/config/dhcp on the AR150
Here we simply tell our router to start two different dhcp services, one on LAN and one on TOR.
As you can notice, I disable ipv6 bacause of my lack of knowledge, and tell the dhcp service to serve my very own list of DNS servers instead of the ISP provided ones.
config dnsmasq

option domainneeded '1'

option boguspriv '1'

option filterwin2k '0'

option localise_queries '1'

option rebind_protection '1'

option rebind_localhost '1'

option local '/lan/'

option domain 'lan'

option expandhosts '1'

option nonegcache '0'

option authoritative '1'

option readethers '1'

option leasefile '/tmp/dhcp.leases'

#	option resolvfile '/tmp/resolv.conf.auto'

option resolvfile '/etc/resolv.conf.backup'

option localservice '1'
config dhcp ‘lan’
option interface ‘lan’
option start ‘100’
option limit ‘150’
option leasetime ’12h’
option ra ‘server’
config dhcp ‘tor’
option interface ‘tor’
option start ‘100’
option limit ‘150’
option leasetime ’12h’
config dhcp ‘wan’
option interface ‘wan’
option ignore ‘1’
config odhcpd 'odhcpd'

option maindhcp '0'

option leasefile '/tmp/hosts/odhcpd'

option leasetrigger '/usr/sbin/odhcpd-update'
## /etc/config/firewall on the AR150
Here we disable ipv6 (still because of my lack of knowledge, set up a new TOR set of rules for iptables, allow dhcp from the ISP router (WAN) to serve an IPaddress to LAN and setup basic protection for the LAN network. Then we move on to set up protection for the TOR network, which will initiate a connection to a tor-entry-node via the LAN network: on this TOR network we only allow clients to receive a dhcp address, to serve DNS requests through tor, and to open a SOCKS and a “transparent” port to the tor network.
Finally we tell our AR150 to include in its firewall configuration the rules described in /etc/firewall.user.
config defaults

option syn_flood	1

option input		ACCEPT

option output		ACCEPT

option forward		REJECT

# Uncomment this line to disable ipv6 rules

option disable_ipv6	1
config zone
option name lan
list network ‘lan’
option input ACCEPT
option output ACCEPT
option forward ACCEPT
config zone
option name wan
list network ‘wan’
# list network ‘wan6’
option input REJECT
option output ACCEPT
option forward REJECT
option masq 1
option mtu_fix 1
config zone
option name ‘tor’
option input ‘REJECT’
option output ‘ACCEPT’
option forward ‘REJECT’
option network ‘tor’
option conntrack ‘1’
config forwarding
option src lan
option dest wan
# We need to accept udp packets on port 68,
# see https://dev.openwrt.org/ticket/4108
config rule
option name Allow-DHCP-Renew
option src wan
option proto udp
option dest_port 68
option target ACCEPT
option family ipv4
# Allow IPv4 ping
config rule
option name Allow-Ping
option src wan
option proto icmp
option icmp_type echo-request
option family ipv4
option target ACCEPT
config rule
option name Allow-IGMP
option src wan
option proto igmp
option family ipv4
option target ACCEPT
### TOR RULES
config rule
option name ‘Allow-Tor-DHCP’
option src ‘tor’
option proto ‘udp’
option dest_port ’67’
option target ‘ACCEPT’
option family ‘ipv4’
config rule
option name ‘Allow-Tor-DNS’
option src ‘tor’
option proto ‘udp’
option dest_port ‘9053’
option target ‘ACCEPT’
option family ‘ipv4’
config rule
option name ‘Allow-Tor-Transparent’
option src ‘tor’
option proto ‘tcp’
option dest_port ‘9040’
option target ‘ACCEPT’
option family ‘ipv4’
config rule
option name ‘Allow-Tor-SOCKS’
option src ‘tor’
option proto ‘tcp’
option dest_port ‘9050’
option target ‘ACCEPT’
option family ‘ipv4’
# include a file with users custom iptables rules

config include

option path /etc/firewall.user
## /etc/firewall.user on the AR150
Here we instruct our AR150 to do two simple but very important things: in the TOR network, server all DNS requests (udp 53) through the tor-network, and tunnel every tcp request through and only through the initiated connection to a tor-entry-node that we’ll set up in the /etc/tor/torrc section of this document.
tor_rules() {

iptables -t nat -A PREROUTING -i br-tor -p udp --dport 53 -j REDIRECT --to-ports 9053

iptables -t nat -A PREROUTING -i br-tor -p tcp --syn -j REDIRECT --to-ports 9040

}

tor_rules
## /etc/tor/torrc on the AR150
Here the AR150 will be instructed to start a connection to a tor-entry-node, and act as a “kind of VPN” router to the tor-network, opening 3 ports to client in our local TOR network.
If you experience problems, remember to activate (and later deactivate, because it’s a lot of data) logs about the tor connection in this file, uncommenting the “Log notice file” line!
For further information about torrc, please refer to the tor documentation.
AllowUnverifiedNodes middle,rendezvous

VirtualAddrNetworkIPv4 172.16.1.0/11

AutomapHostsSuffixes .onion,.exit

AutomapHostsOnResolve 1
TransPort 9040
TransListenAddress 172.16.1.1
DNSPort 9053
DNSListenAddress 172.16.1.1
SocksPort 9050

SocksBindAddress 172.16.1.1:9050
## /etc/resolv.conf.backup on the AR150
I use this file to instruct our dhcp service (as described in /etc/config/dhcp) to use DNS service of our choiche instead of the ones provided by our ISP.
I tend to prefer to use the services offered by opendns here listed, but remebmer to use here the ones you prefer!
# OpenDNS IPv4 nameservers

nameserver 208.67.222.222

nameserver 208.67.220.220
## /etc/init.d/tor on the AR150
We have to instruct our router to automatically start a tor connection on boot. This is done via init scripts:
# /etc/init.d/tor enable
# /etc/init.d/tor start
## /etc/rc.local on the AR150
Here we activate macchanger on boot, telling our AR150 to scramble it’s real WAN MAC-address to a random one, for added privacy.
/sbin/ifconfig eth0 down ; /usr/bin/macchanger -b -r eth0 ; /sbin/ifconfig eth0 up

exit 0
## Considerations about using a device different then the AR150
You can reproduce this setup with any other device supported by lede, not only the AR150.
Please remember that this setup:
– needs some flash storage space (at least 16MB required)
– requires a decent amount of RAM (at least 64MB) and a decent CPU (about 400MHz at least)
– to reproduce this setup you’ll need a wifi chip capable of emitting different wlan’s. I only tested it with ar71xx devices.
– Every device has a different switch setup, defining it’s interfaces and ports. Use “swconfig” (ex: swconfig dev switch0 show) to determine yours and change configurations accordingly in /etc/config/network.
## Considerations about adding a third VPN network
It is possible and it works to add a third network in the same way, letting the AR150 manage a connection to a VPN server, and creating a VPN-LAN network behind it, separate from the LAN and TOR networks.
I did not add the configuration here because it would have been too long and complicate to describe at once, it’s a job I reserve for the future, based on the interest shown by my fellow sysadmins.
Simply, keep in mind that a VPN-LAN network will add a notorious amount of stress to the RAM and CPU of our router, so we’d better do it with a device running 128MB RAM, like the gl-inet AR300!
### LEDE on WDR841N configuration
## Overview of the final configuration
LAN port 1= tagged VLAN 1 (LAN), tagged VLAN 2 (TOR)
LAN ports 2,3,4 = LAN
wlan0 wifi = LAN
wlan0.1 wifi = TOR
Relevant files are:
– /etc/config/network
– /etc/config/wireless
– /etc/config/dhcp
– /etc/config/firewall
## Install lede to the tp-link WDR841N
Download the latest lede release (as of march 2017), remember that hardware version matter! In this particular case we use hardware version 9 https://downloads.lede-project.org/releases/17.01.0/targets/ar71xx/generic/lede-17.01.0-r3205-59508e3-ar71xx-generic-tl-wr841-v9-squashfs-sysupgrade.bin
Once again, we will run a sysupgrade deleting all previous configuration, if you’re ‘still reading this document, you’ll know how to do it!
We do not need to install any extra packages on this device: it has only 4MB flash storage and 16MB RAM so, though the cpu rate is ok at 650MHz, we’ll leave the AR150 do the hard job.
## /etc/network/config on the WDR841N
We instruct our WDR841N to recognize two different VLANs on the LAN ethernet port 1 (internal number: 2), and to encapsulate in those VLANs the correct networks and wifi networks (roaming with the ones configured on the AR150. We’ll also assign the rest of the LAN ethernet ports (yellow) to serve the LAN network.
Once again, because of my lack of knowledge, I disable ipv6!
config interface 'loopback'

option ifname 'lo'

option proto 'static'

option ipaddr '127.0.0.1'

option netmask '255.0.0.0'
config interface ‘lan’
option type ‘bridge’
option ifname ‘eth1.1’
option proto ‘static’
option ipaddr ‘192.168.10.2’
option netmask ‘255.255.255.0’
option gateway ‘192.168.10.1’
option dns ‘192.168.10.1’
config interface ‘tor’
option type ‘bridge’
option proto ‘dhcp’
option ifname ‘eth1.2’
option _orig_ifname ‘eth1.2 wlan0-1’
option _orig_bridge ‘true’
config interface ‘wan’
option ifname ‘eth0’
option proto ‘dhcp’
config switch
option name ‘switch0’
option reset ‘1’
option enable_vlan ‘1’
config switch_vlan
option device ‘switch0’
option vlan ‘1’
option ports ‘0t 1 2t 3 4’
config switch_vlan

option device 'switch0'

option vlan '2'

option ports '0t 2t'
## /etc/network/wireless on the WDR841N
Here we simply configure two networks, which /etc/config/network encapsulates in the correct VLAN.
Remember that, for wifi-roaming to succeed, the SSID, password and encryption type must be the same on the two devices (AR150 and WDR841N), only the channel changes!
Again, for privacy reasons, we scramble the MAC-addresses of the wifi interfaces.
config wifi-device 'radio0'

option type 'mac80211'

option channel '6'

option hwmode '11g'

option path 'platform/ar934x_wmac'

option htmode 'HT20'

option txpower '18'

option country 'US'

option distance '30'
config wifi-iface ‘default_radio0’
option device ‘radio0’
option network ‘lan’
option mode ‘ap’
option ssid ‘LAN-wifi’
option encryption ‘psk2+aes’
option key ‘Your_supersecret_password_for_LAN’
option macaddr ’84:df:69:a2:77:ab’
config wifi-iface 'tor_radio0'

option device 'radio0'

option network 'tor'

option mode 'ap'

option ssid 'TOR-wifi'

option encryption 'psk2+aes'

option key 'Your-supersecret-password-for-TOR'

option macaddr 'ab:e7:77:a5:a5:ce'
## /etc/network/dhcp on the WDR841N
We do not want this device to run dhcp services (the AR150 takes care of it), so we simply add a line to the “config dhcp ‘lan'” section of this file
option ignore '1'
## /etc/network/firewall on the WDR841N
This could be matter for an interesting discussion…
Trusting my AR150, I do only here add a “TOR” section to the firewall, but leave it open to receive and forward packages, so that I can still use my internal “TOR LAN” as a network and add some local services, like a music stream service. The AR150 TOR IPaddress will not be reachable, but the other clients of this “TOR LAN” will be able to contact themselves.
Feel free to restrict the following rules, and please correct my possible security flaws in this setup.
So, simply, after the lan “config zone” section, add the tor config zone:
config zone

option name             tor

list   network          'tor'

option input            ACCEPT

option output           ACCEPT

option forward          ACCEPT
## Considerations about ports
You can play with the ethernet port assignment of this router. Enable one of the ports to encapsulate the two VLANs and you can send them to a third router further expanding our LAN and TOR networks, or allow the yellow LAN ports to serve TOR instead of LAN, or even attach a third VLAN to the device for VPN traffic.
Whatever you do, remember to use the “swconfig” command extensively: the port number on the board is NOT the same as the logical port number, and the WAN blue port is directly attached to eth0!
## Considerations about using a device different then the WDR841N
We are here in the cheap/recicled range of lede powered routers… you can reproduce this “slave” setup in virtually any devices, because it relies on it’s “master” AR150 for flash storage, RAM and CPU.
Again , use the “swconfig” command extensively to map the correct ports and remember that I did not test the multiple WLANs capability on devices else then ar71xx!
### Final words
I hope this setup will help you in setting up a more private network configuration with little investment (less then 50.- euros).
You could archeive all this also using LUCI, the web interface to lede configuration but, as you can imagine, better to understand it first on the command line!
Leave a Reply